CLICK HERE FOR FREE BLOGGER TEMPLATES, LINK BUTTONS AND MORE! »
Showing posts with label tutorial. Show all posts

Thursday, February 16, 2012

Silhouette Print and Cut tutorial: Airplane party lunch tags


I am the first of my hometown buddies to buy a Silhouette.  A few people own a Cricut, but I get questions about the Silhouette all the time.  What is it?  How is it different?  Do you like it?  What exactly does it do?

I thought it might be fun to take pictures of a print and cut session to show people an example of what the Silhouette does and looks like.  As many of you know, I am throwing my soon to be 3 year old an airplane party.  He walks around the house talking about airplanes all the time.  He is just a teensy bit excited!

I wanted to print and cut the "in flight" lunch box labels for the party, so I am designing, printing and cutting those today.  Join me!  You do not have to print designs for the Silhouette to cut.  You can just cut out shapes/outlines/letters, etc. (no printer involved), which is the first task I learned on the Silhouette.  You simply take the downloaded shape on your computer, size it the way you want, send it to the Silhouette, and it cuts the shape.  You can cut paper, cardstock, vinyl, fabric and more.

I have made vinyl letters for signs and paper letters for banners.  I have cut out shapes for Christmas decor.  I have cut out tags and various shapes for present cards, party tags, etc.  It is my favorite crafting tool.

I bought these DARLING aqua polka dot boxes from Polka Dot Market to hold each lunch for the party.  We are doing a vintage airplane feel for the party, so the "boxed" in-flight lunch was a cute play on that.  I will make little sandwiches, have a bag of chips and add clear cups of fruit. My colors are aqua and orange--so fun!


First, I open the Silhouette program on my computer.  Here I have my computer plugged into the Silhouette.  There are no cartridges to buy for the Silhouette.  Every cut, design, and project comes from your computer.

I had made some circular tags, but I am not over the moon about them.  I will create some new ones for this tutorial.

I first copy my downloaded "ticket" shape (I used these for the invites) onto my blank computer page and "ungroup" the shape.


I remove the airplane shape and delete the rest.  I can resize the airplane to fit into an outer label shape.

I pick a classic, scalloped square shape to be the outline of my labels.

I use the font tool to add the word "lunch" in an "Airplane" font I downloaded for free from Lovely Little Snippets.  I found the link on Pinterest.  I place the airplane and font inside the square and size them.

Cute!

At first I did everything in black because I was going to print the design on orange paper.  I did a print and didn't love it on the orange. 

I decided to do orange fill paint in each shape and print it on white cardstock.  (Sorry, I didn't take a picture of this, but just click on the shape you want to fill (select it) and then click on the paint can at the top.  Pick your color and you're done!).

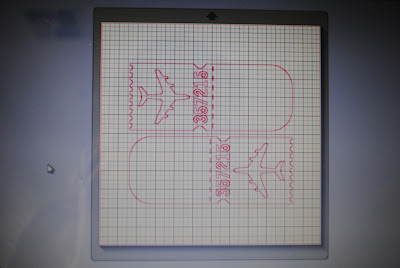
On the Silhouette, you need to make sure you check the box "show the registration marks" to print.  This will help the machine to accurately cut the design you are printing.  Here is the screen BEFORE I checked the box.

I also took the one shape I designed and just hit "duplicate" until I filled my page. 


When you choose how the machine will cut your design, you want to select the inside shapes (ungroup the entire design and select each part).  Check "no cut" under the cutting style window.  Then just the outside label will be cut from the printed sheet.  The dark pink line is where the machine will cut.


I printed the sheet on my printer.  The scalloped lines are light since they will be cut.
I put it into my Silhouette and had it read the registration marks.  It got to work and cut out the labels.


I took each label and some teal ribbon I bought at Costco for the spring season.  I wrapped the ribbon around the box and then added my label. 

Perfect!  They are a cross between a suitcase and a boxed lunch--just the look I wanted.

Since I broke down all the steps, it sounds much more complicated than it actually is.  It just takes a few hours of playing with the Silhouette program to grasp how to use the different functions, and they have a great tech support you can call for help.

I'll show you more projects as I prepare for the party.  I still have so much to do, but I'm having so much fun!


Monday, January 23, 2012

Personalized Bulletin Board Tutorial

About a year ago, I made a giant, very affordable bulletin board with foam core and fabric.  You can see that tutorial here.  It was great until my 2 year old--whom we nicknamed Destructo very early on--got to it.  After a few swipes and knocking it off the wall, it started to fall apart, and pins were everywhere in the carpet.  Foam core had met its match.

My hubby asked if I could use a normal bulletin board with cork and decorate that for our wall.  It would hang more securely, and it would hold the pins more firmly.  In other words, it would be Destructo proof. 

I found two, smaller bulletin boards (one for each boy) at Costco and brought them home.  I was looking for some fun Mod type fabric, but I didn't find exactly what I wanted.  The fabrics were too feminine or too plain.  I knew the fabric needed to complement the tan walls and leather couch in our playroom, so I found a seafoam green fabric that worked.


I made one bulletin board by stapling the fabric into place along the edges--my teaching skills in making bulletin boards came back to me.  I didn't like all the wrinkles and loose fabric that resulted, though.  I picked the most wrinkle prone fabric in the store.  I ironed and ironed until my hand hurt, but it seemed to only multiply the wrinkles. So I made the second bulletin board by using spray adhesive.  I sprayed the cork and smoothed the fabric over the cork.  MUCH better!  I stapled the edges and then I glued a thick, dark chocolate ribbon around the edge of both bulletin boards.  I used my photo drink coasters to hold down the ribbon as the glue dried in the corners of the ribbon. 


The stapled edges before the ribbon was glued around the edges.

Do you see the wrinkles?  Ugh!  The second one is MUCH better, but I didn't take a prep picture of it.

Finally, I printed out each boy's name on dark brown vinyl on my Silhouette.  It added a little fun touch to have each board labeled with chunky letters.


Voila!  My hubby hung up both of the boards, and now we are ready to see if they are Destructo proof.

Monday, January 9, 2012

Canvas Verse Tutorial

I have a good friend who has a birthday this week!  I thought it would be fun to create a subway style canvas piece with her favorite Bible verse.  It wasn't difficult, just time consuming.  It will get easier now that I've made my first sign.


Get a blank canvas.  I got mine at Michael's.  I bought a 12 by 14 inch size.


Paint the top of the white canvas white.  Why, you ask?  I'll show you in a minute, but it is for touch up purposes.


Once you let the white paint dry (mine dried overnight), you can cut out your adhesive vinyl letters.  I used my Silhouette to write out most of the words from Jeremiah 29:11,13.  Next time I will play with the size of each word and have more variance.


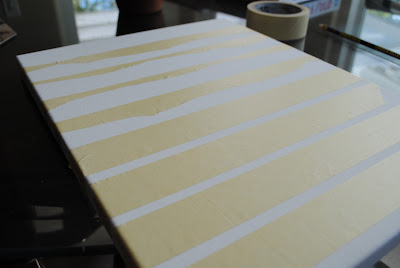
Tape off lines equadistance apart from one another on the canvas.  My masking tape lines are 1 and 3/4 inches apart.


As you attach the vinyl letters, you can play with spacing and take off the masking tape as you go.


Voila!


Now you need to choose a color to paint or spray paint your canvas.  I wanted a distressed look, so I wasn't going for glossy, perfect coverage.  My 2 year old dumped his snack bowl on the wet paint, so I had to actually add more spray paint than I planned, which took some of the grayish look I wanted away.  If you want an even spray, do a few coats.


Peel up the vinyl letters after the spray paint dries.  MAKE SURE your vinyl letters are pressed down tightly before you spray, as you get bleeding into the white space.  Don't worry, though,  because you painted the canvas a white that you can match and touch up!  This first letter was my worst one.


Here is the final product.  I dry brushed some white to make the canvas look more distressed.  The edges look great with the dry brush technique.

I like it!  I want to make one for my house that is in softer font and with a mustard or sage color.  I hope my friend likes it!  Have fun creating!

This post is linked to:

Todays Creative Blog

Monday, August 15, 2011

Party Tip: Ice Bowl


If you are throwing a summer shin dig, big or small, a great way to make a statement with your food display is by making an ice bowl to hold your food.  It is extremely easy, you can make it any size you need, you can decorate the bowl with any edible or safe flowers, fruit slices or decorations, and it makes a big impact.

Of course, you want to keep the bowl on a summery platter or plate to catch water as it melts, and you don't want to display it in full sun.  If you put any moist food items inside, you want to put a pretty lettuce lining inside so the food doesn't stick to the bowl as it is dished (think of the "tongue on a frozen pole" effect).

Here are the easy steps to make your own:


You need to get stacking bowls.  Your ice bowl will be the size of the larger stacking bowl.

Fill the larger bowl with water (about 2/3 full)

Place the smaller bowl inside and weigh it down so it sits inside and displaces the water--I used more water in the small bowl to weigh it down.
Place in your freezer until the water is starting to freeze and get thick.

Pick an edible or safe decoration to sit inside the ice.  Ideas:  Fruit slices, edible plants or flowers, thematic decorations.
Stick the decor down the sides between the bowls and spread them all around in the icy water.

After 24 hours, take the bowls out of the freezer and remove the smaller bowl from the top (it usually twists right out, but you might use warm water for a SECOND to loosen it).

Twist the ice bowl out of the larger bowl (again, if needed, QUICKLY run warm water on the bottom of the bowl to loosen the ice).

Ready for a summer food table!

So summery and fresh!  Have fun!

I linked this post to:

The Girl Creative
Tip Junkie handmade projects
Todays Creative Blog
Related Posts Plugin for WordPress, Blogger...